Heute am 1. Weihnachtstag 2015 ist BananaPi-Tag :) Ich habe mir mal vorgenommen das aktuelle Bananian auf eine HDD zu bügeln und mal zu schauen ob es noch geht :)
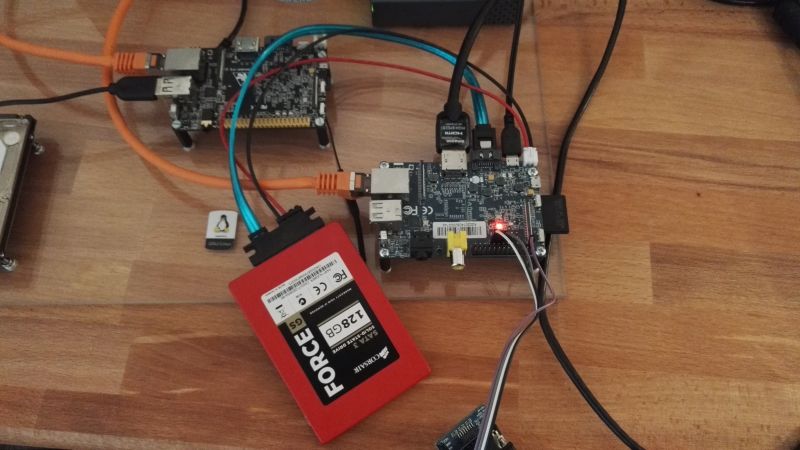
Ich habe hier also folgendes liegen:
- BananaPi M1
- SD-Karte 4GB
- SSD 120GB
- SATA-Kabel
Bananian auf SD-karte schreiben! Für Einsteiger -> BananaPI - Erste Schritte
SD-Karte in den Schacht, Festplatte anschließen und den BPi einschalten. Nun konfigurieren wir erst mal das System.
bananian.config
Das sollte soweit selbsterklärend sein. Danach neu starten.
shutdown -r now
Die angeschlossene HDD war benutzt, also müssen die vorhandenen Partitionen gelöscht werden.
ACHTUNG! Ab hier besteht die Gefahr von Datenverlust. Bitte vorher das Gehirn einschalten und denkt dran, ich übernehme kein Garantie für Eure Daten :)
Mit fdisk schauen wir uns erstmal alles an.
130 root@bananapi ~ # fdisk -l :(
Disk /dev/sda: 119.2 GiB, 128035676160 bytes, 250069680 sectorsUnits: sectors of 1 * 512 = 512 bytesSector size (logical/physical): 512 bytes / 512 bytesI/O size (minimum/optimal): 512 bytes / 512 bytesDisklabel type: dosDisk identifier: 0x000ebd3b
Device Boot Start End Sectors Size Id Type/dev/sda1 * 2048 242356223 242354176 115.6G 83 Linux/dev/sda2 242358270 250068991 7710722 3.7G 5 Extended/dev/sda5 242358272 250068991 7710720 3.7G 82 Linux swap / Solaris
Disk /dev/mmcblk0: 3.7 GiB, 3980394496 bytes, 7774208 sectorsUnits: sectors of 1 * 512 = 512 bytesSector size (logical/physical): 512 bytes / 512 bytesI/O size (minimum/optimal): 512 bytes / 512 bytesDisklabel type: dosDisk identifier: 0x0ccea0b3
Device Boot Start End Sectors Size Id Type/dev/mmcblk0p1 2048 43007 40960 20M 83 Linux/dev/mmcblk0p2 43008 3710936 3667929 1.8G 83 Linux
Danach wählen wir die Platte aus, die bearbeitet werden soll.
root@bananapi ~ # fdisk /dev/sda
Welcome to fdisk (util-linux 2.25.2).Changes will remain in memory only, until you decide to write them.Be careful before using the write command.
Command (m for help):
Dann mit "d" Partition auswählen.
Command (m for help): dPartition number (1,2,5, default 5): 5
Partition 5 has been deleted.
Das dann für alle Partitionen wiederholen.
Zum Schluß mit w die Änderungen auf die Platte schreiben.
Nun erzeugen wir eine neue Partition
fdisk /dev/sda
Welcome to fdisk (util-linux 2.25.2).Changes will remain in memory only, until you decide to write them.Be careful before using the write command.
Command (m for help): nPartition typep primary (0 primary, 0 extended, 4 free)e extended (container for logical partitions)Select (default p): pPartition number (1-4, default 1): 1First sector (2048-250069679, default 2048): 2048Last sector, +sectors or +size{K,M,G,T,P} (2048-250069679, default 250069679): 250069679
Created a new partition 1 of type 'Linux' and of size 119,2 GiB.
Command (m for help): wThe partition table has been altered.Calling ioctl() to re-read partition table.Syncing disks.
Schauen wir uns das Ergebnis nochmal an.
root@bananapi ~ # fdisk -l
Disk /dev/sda: 119,2 GiB, 128035676160 bytes, 250069680 sectorsUnits: sectors of 1 * 512 = 512 bytesSector size (logical/physical): 512 bytes / 512 bytesI/O size (minimum/optimal): 512 bytes / 512 bytesDisklabel type: dosDisk identifier: 0x000ebd3b
Device Boot Start End Sectors Size Id Type/dev/sda1 2048 250069679 250067632 119,2G 83 Linux
Disk /dev/mmcblk0: 3,7 GiB, 3980394496 bytes, 7774208 sectorsUnits: sectors of 1 * 512 = 512 bytesSector size (logical/physical): 512 bytes / 512 bytesI/O size (minimum/optimal): 512 bytes / 512 bytesDisklabel type: dosDisk identifier: 0x0ccea0b3
Device Boot Start End Sectors Size Id Type/dev/mmcblk0p1 2048 43007 40960 20M 83 Linux/dev/mmcblk0p2 43008 7774207 7731200 3,7G 83 Linux
Nun muss eine Festplatte auch noch formatiert werden, das macht man mit mkfs.ext4 /dev/sda1
root@bananapi ~ # mkfs.ext4 /dev/sda1mke2fs 1.42.12 (29-Aug-2014)/dev/sda1 hat ein ext4-Dateisystemzuletzt auf / auf Sun Dec 21 09:09:08 2014eingehängtTrotzdem fortfahren? (j,n) jGeräteblöcke werden verworfen: erledigtEin Dateisystems mit 31258454 (4k) Blöcken und 7815168 Inodes wird erzeugt.UUID des Dateisystems: bc260a48-eb4d-4491-bdbc-0b8758eeacc9Superblock-Sicherungskopien gespeichert in den Blöcken:32768, 98304, 163840, 229376, 294912, 819200, 884736, 1605632, 2654208,4096000, 7962624, 11239424, 20480000, 23887872
beim Anfordern von Speicher für die Gruppentabellen: erledigtInode-Tabellen werden geschrieben: erledigtDas Journal (32768 Blöcke) wird angelegt: erledgtDie Superblöcke und die Informationen über die Dateisystemnutzung werdengeschrieben: erledigt
Damit wäre die HDD fertig eingerichtet! Nun binden wird die HDD ins Sys ein
mount /dev/sda1 /mnt/
Nun kopieren wir den Inhalt der SD-Karte auf die HDD.
rsync -ax / /mnt/
Wenn alles fertig kopiert ist, unmounten wir die HDD und mounten die SD-Karte um die Bootparameter zu ändern.
umount /mnt/mount /dev/mmcblk0p1 /mntnano /mnt/boot.cmd
In früheren Versionen musste noch die uEnv.txt editiert werden. Das hat sich geändert.
So sieht die geänderte boot.cmd aus.
#--------------------------------------------------------------------------------------------------------------------------------
# Boot loader script to boot with different boot methods for old and new kernel
# Credits: https://github.com/igorpecovnik - Thank you for this great script!
#--------------------------------------------------------------------------------------------------------------------------------
if load mmc 0:1 0x00000000 uImage-next
then
# mainline kernel >= 4.x
#--------------------------------------------------------------------------------------------------------------------------------
setenv bootargs console=ttyS0,115200 console=tty0 console=tty1 root=/dev/sda1 rootfstype=ext4 elevator=deadline rootwait
load mmc 0:1 0x49000000 dtb/${fdtfile}
load mmc 0:1 0x46000000 uImage-next
bootm 0x46000000 - 0x49000000
#--------------------------------------------------------------------------------------------------------------------------------
else
# sunxi 3.4.x
#--------------------------------------------------------------------------------------------------------------------------------
setenv bootargs console=ttyS0,115200 console=tty0 console=tty1 sunxi_g2d_mem_reserve=0 sunxi_ve_mem_reserve=0 hdmi.audio=EDID:0 disp.screen0_output_mode=EDID:1680x1050p60 root=/dev/sda1 rootfstype=ext4 elevator=deadline rootwait
setenv bootm_boot_mode sec
load mmc 0:1 0x43000000 script.bin
load mmc 0:1 0x48000000 uImage
bootm 0x48000000
#--------------------------------------------------------------------------------------------------------------------------------
fi
Diese Datei boot.cmd muß jetzt noch in eine ausfährbare Datei verwandelt werden. Dafür benutzt man folgenden Befehl.
cd /mnt
mkimage -C none -A arm -T script -d boot.cmd boot.scr
Dann kommt folgendes:
root@bananapi /mnt # mkimage -C none -A arm -T script -d boot.cmd boot.scrzsh: command not found: mkimage
Ok, mkimage fehlt.
apt-get install u-boot-tools
Danach geht es.
root@bananapi /mnt # mkimage -C none -A arm -T script -d boot.cmd boot.scrImage Name:Created: Fri Dec 25 13:22:01 2015Image Type: ARM Linux Script (uncompressed)Data Size: 1602 Bytes = 1.56 kB = 0.00 MBLoad Address: 00000000Entry Point: 00000000Contents:Image 0: 1594 Bytes = 1.56 kB = 0.00 MB
Nun können wir das Sys neustarten.
shutdown -r now
Nach dem Neustart mal eben schauen ob alles klappt.
root@bananapi ~ # df -hDateisystem Größe Benutzt Verf. Verw% Eingehängt auf/dev/root 118G 1,1G 111G 1% /devtmpfs 486M 0 486M 0% /devtmpfs 98M 212K 97M 1% /runtmpfs 5,0M 0 5,0M 0% /run/locktmpfs 195M 0 195M 0% /run/shm
Fertig! Geht :)
Kurz noch ein Speedtest
apt-get install iperf
Auf meinem Hauptrechner kurz einen iperf Server aufgemacht.
iperf -s
Dann auf dem BananaPi
iperf -c 192.168.x.x
Das Ergebnis:
root@bananapi ~ # iperf -c 192.168.x.x------------------------------------------------------------Client connecting to 192.168.x.x, TCP port 5001TCP window size: 21.0 KByte (default)------------------------------------------------------------[ 3] local 192.168.2.7 port 47120 connected with 192.168.x.x port 5001[ ID] Interval Transfer Bandwidth[ 3] 0.0-10.0 sec 564 MBytes 473 Mbits/seciperf -c 192.168.2.213 0,07s user 9,98s system 100% cpu 10,049 total
Recht ordentlich und das ist auch der absolute Vorteil der BananaPis, die Anbindung einer HDD mittels SATA.
Nun läuft das Sys auf der HDD, sollte die SD-Karte mal kaputt gehen schreibt man sich einfach eine neue und fertig. Die Daten sind auf einer Platte einfach sicherer abgelegt als auf einer SD-Karte (meine Meinung).
Viel Spaß beim Homeserver bauen!